02 / Heeley Bot Project
For my final project in my Digital Electronics class taught by Michael Shiloh, I decided to design and create my first robot. We were asked to create some sort of embedded Arduino project. Since i got into physical computing I always wanted to create a robot, specifically an autonomous “rover”.
Part 1 | Prep
Going into this project the first thing I had to do was figure out what type of robot I wanted to make, and what were the base functions I wanted to program it to do. I decided on a simple 4WD “rover”, using an Ultrasonic PING sensor to achieve obstacle avoidance. I figured out I wanted to attach the PING sensor to a servo so the robot could scan when an obstacle is reached.
Part 2 | Materials & Parts
The next step was to figure out all the main components and parts I needed for this project, my “BOM”
Bill of Materials:
- Arduino Uno x 1
- Adafruit Motor Shield x 1
- Parallax Ping Sensor x 1
- Standard Servo x 1
- Geared DC Motors x 4
- Rubber Wheels x 4
- Robot Chassis x 1
- 5 AA Battery Pack (with batteries) x 1
- 9v Battery x 2
- Various Types of Jumper Wire (stranded and solid core)
- Various Metal Hardware (screws, nuts, washers)
- Toggle Switches x 2
- Shrink Wrap Tubing
- Zip Ties
Here is a breif list of the tools I used on this project:
- Soldering Station
- Wire Strippers
- Wire Cutters
- Screw Drivers
- Multimeter
- Drill
- Solder
- Electrical Tape
Part 3 | Design
After I figured out roughly what parts I was going to need, I started doing research on different hardware variations. I looked around a saw what other people had done in similar projects. The two main things I was thinking about during this stage was, I wanted a design that could be added to and changed, and I wanted my design to be easy to program when the time came. My feeling was simple is better. Below are two different views of the same schematic out of Fritzing. There are a few differences in my actual hardware, this is because Fritzing didn’t have a couple parts I used.
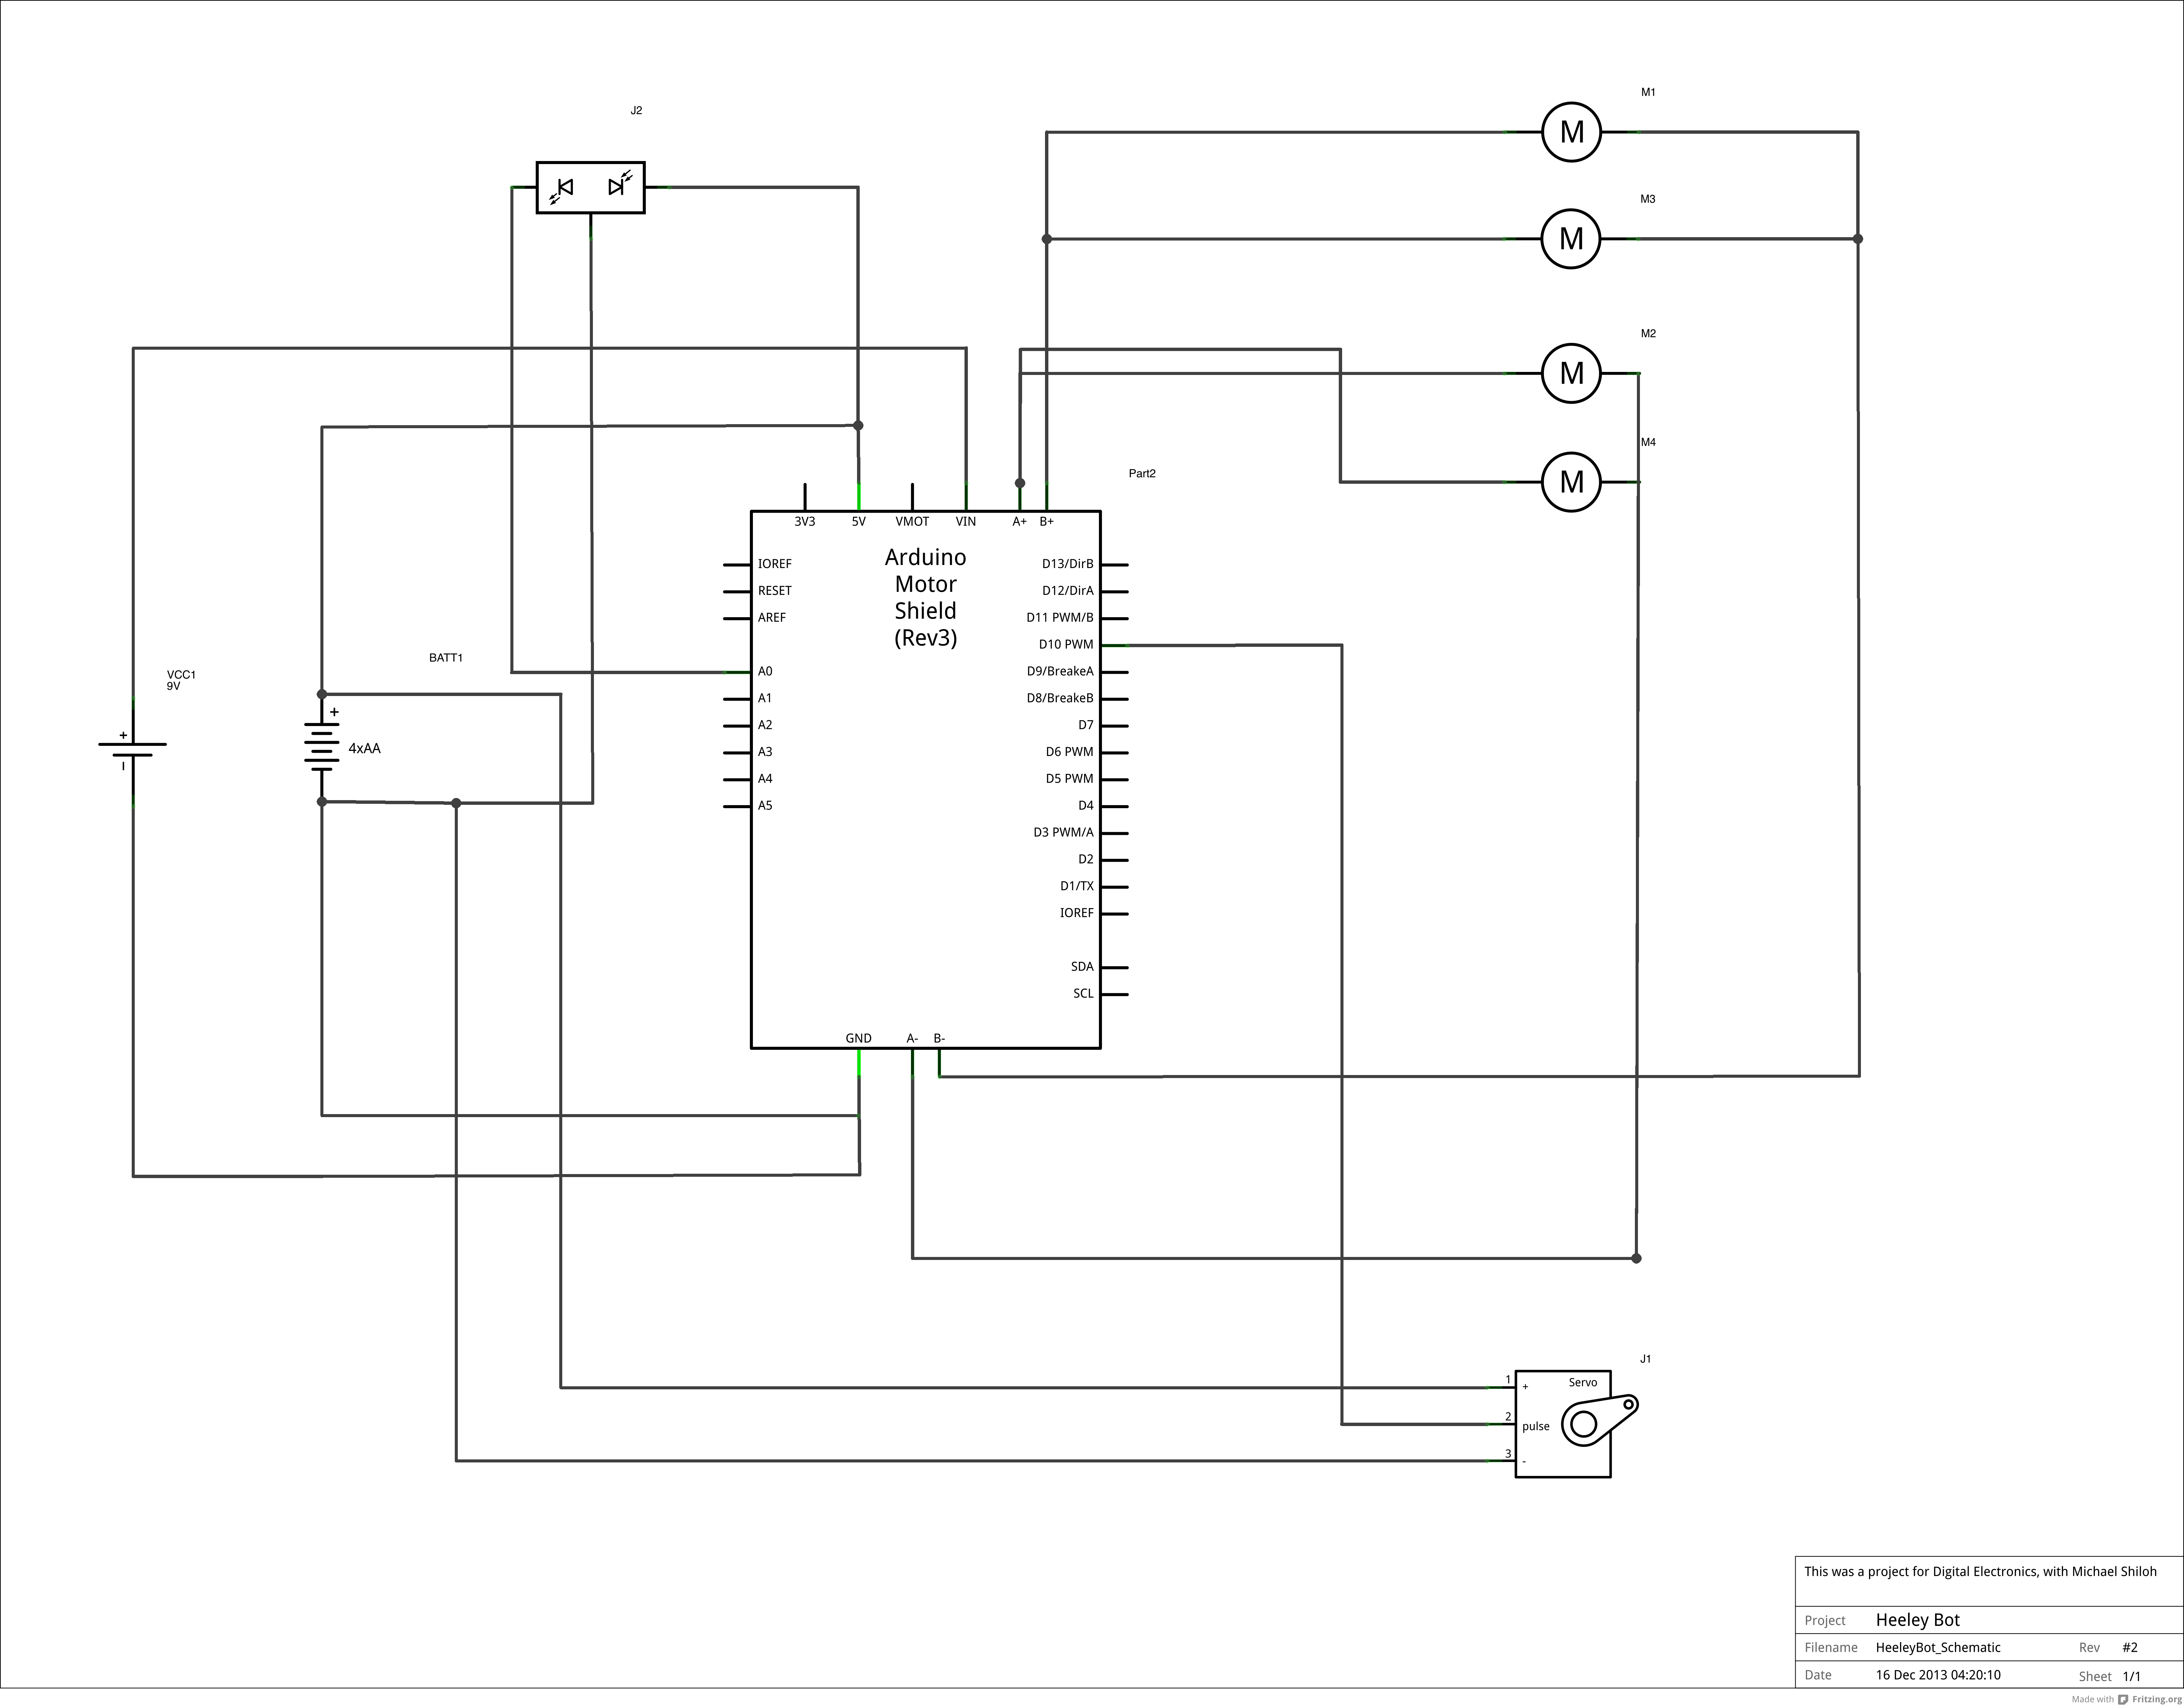
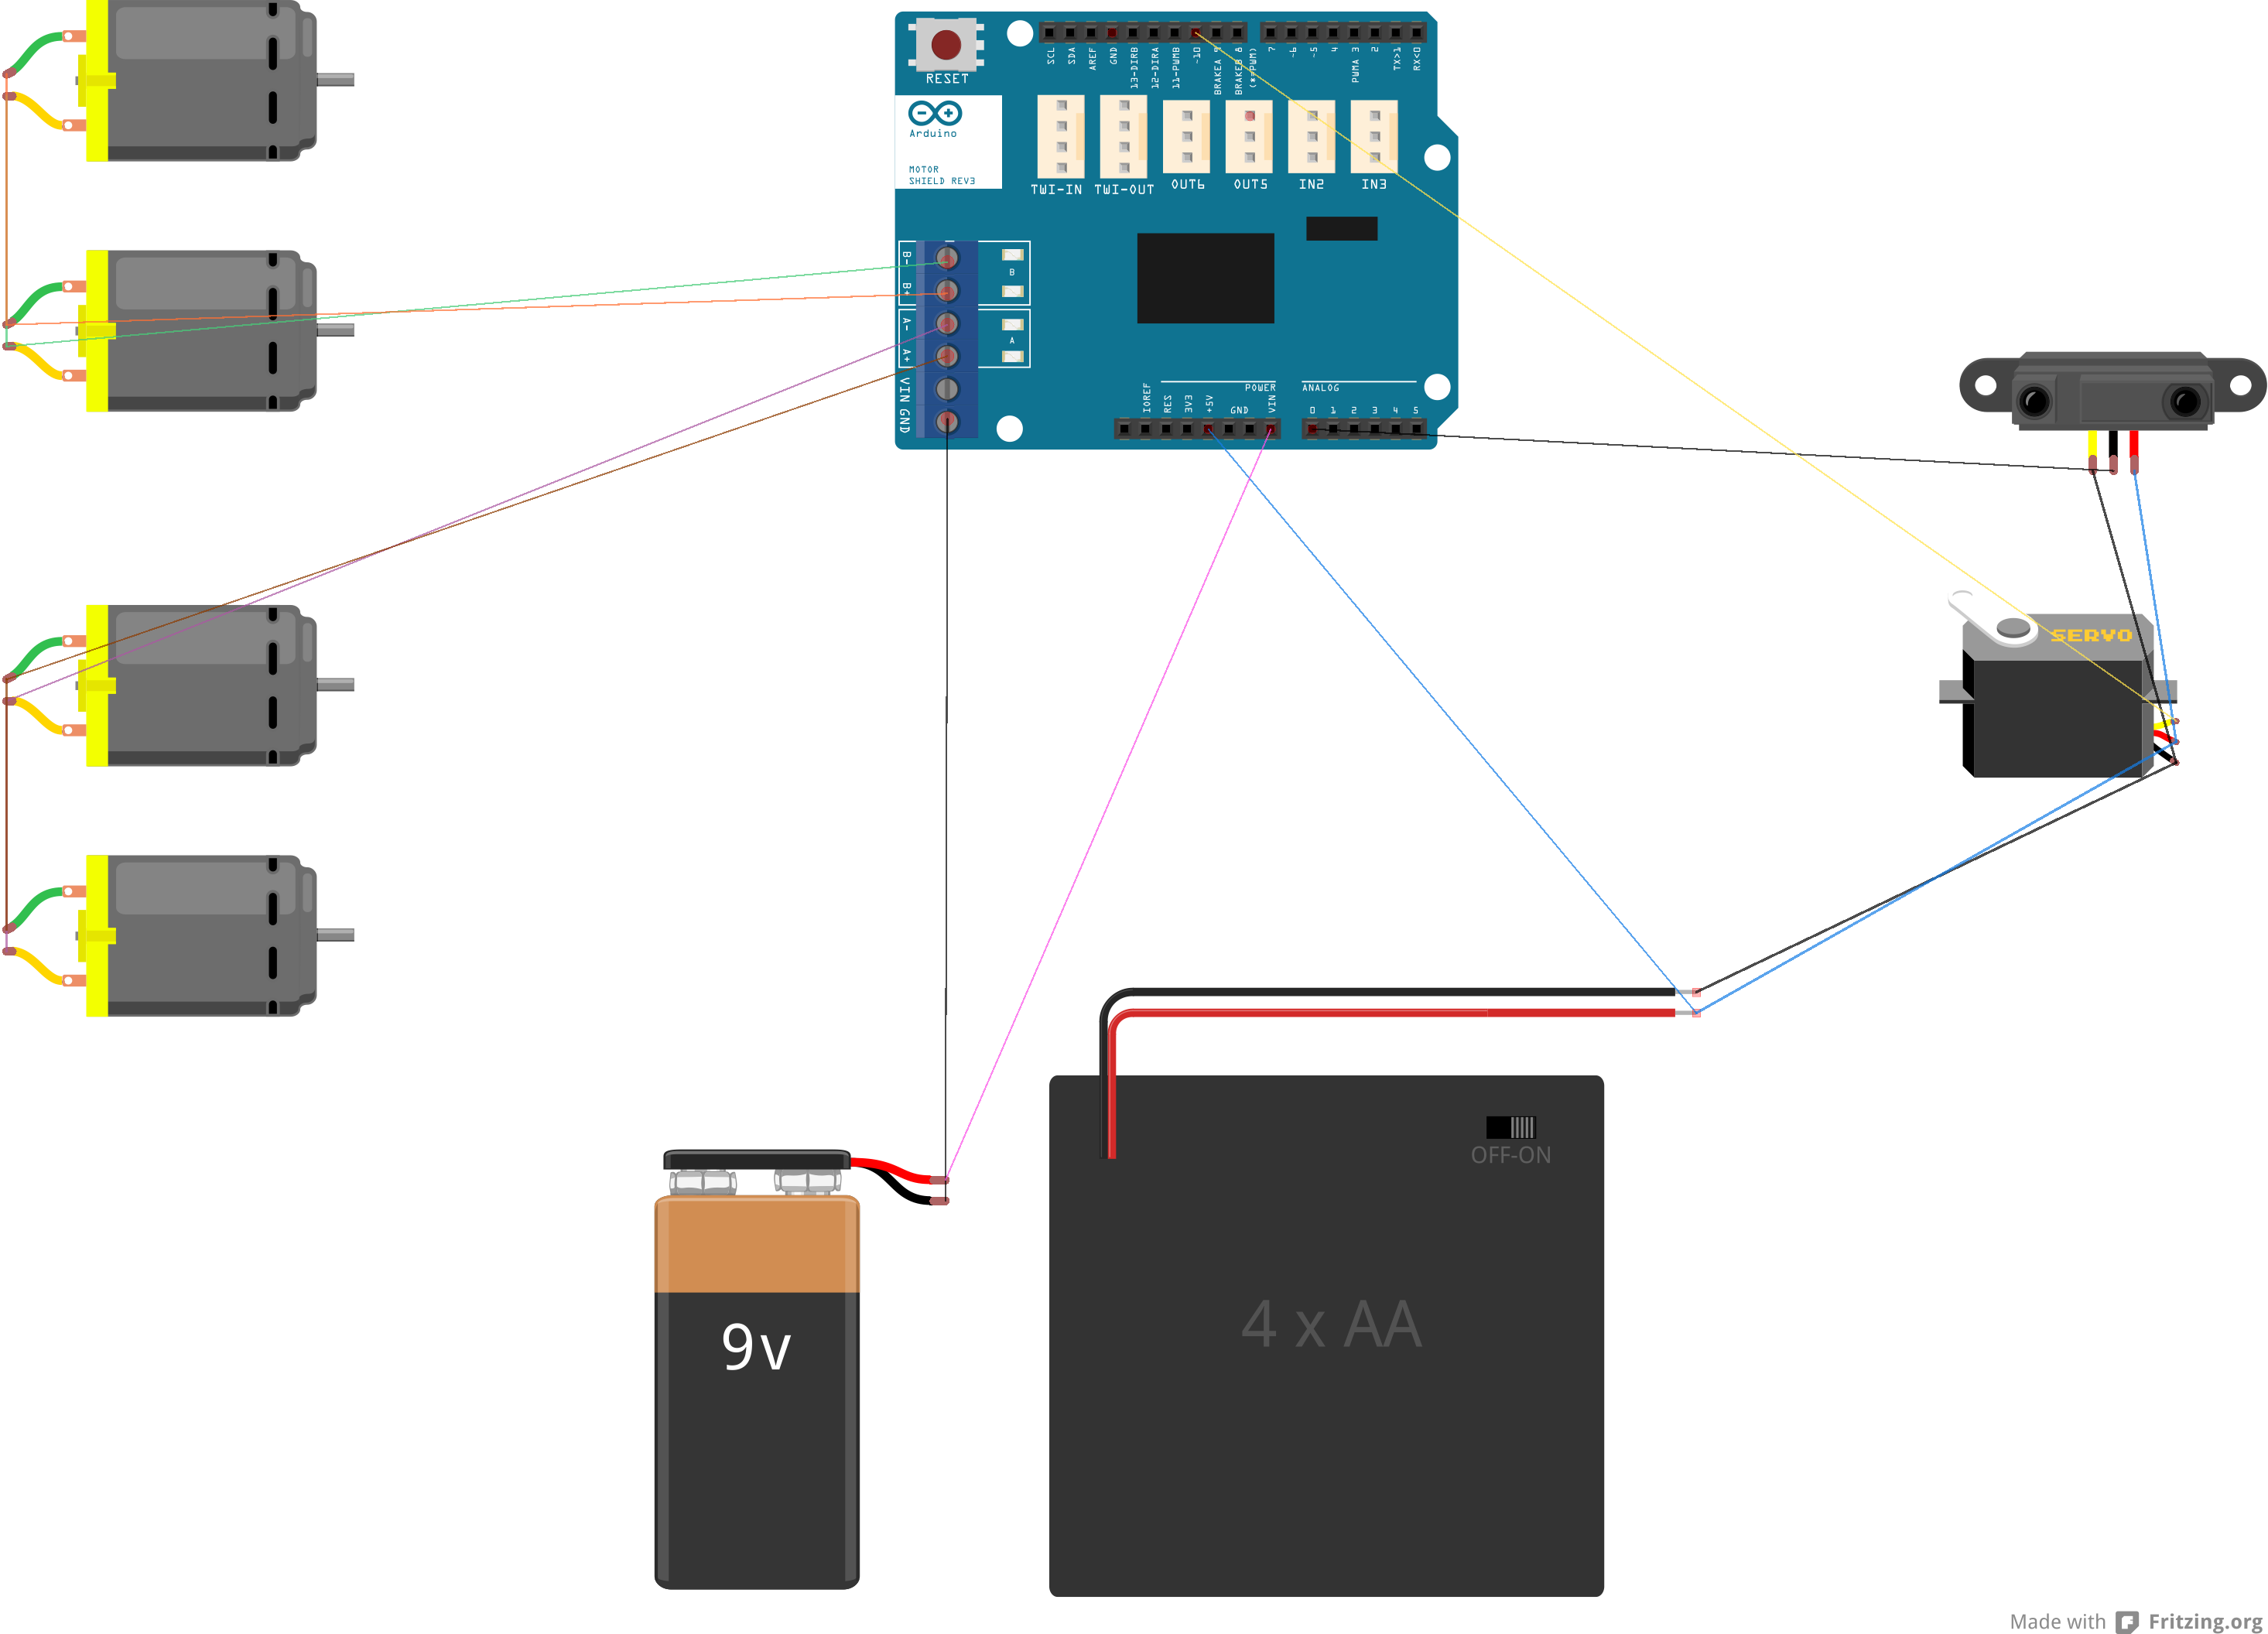
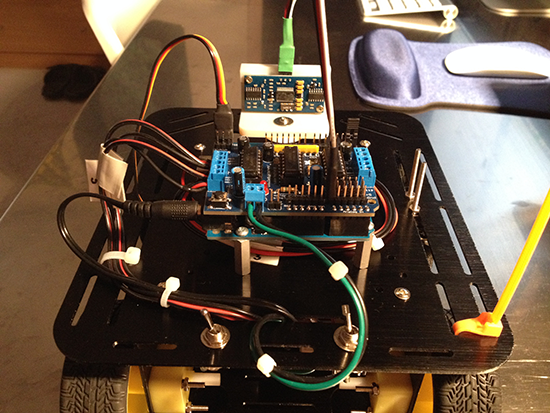
My hardware config is all based upon the Arduino Uno, but it can be any Arduino or Arduino compatible board. Though if you want to use the Adafruit Motor Shield, you need to use a board that is compatible with the standard Arduino shield footprint. Using the Adafruit Motor Shield made a few things very easy. The Motor Shield has special pinouts for two servos, and it’s analog pins are laid out right next to power and ground pins which is perfect for sensor inputs.
Part 4 | The Build
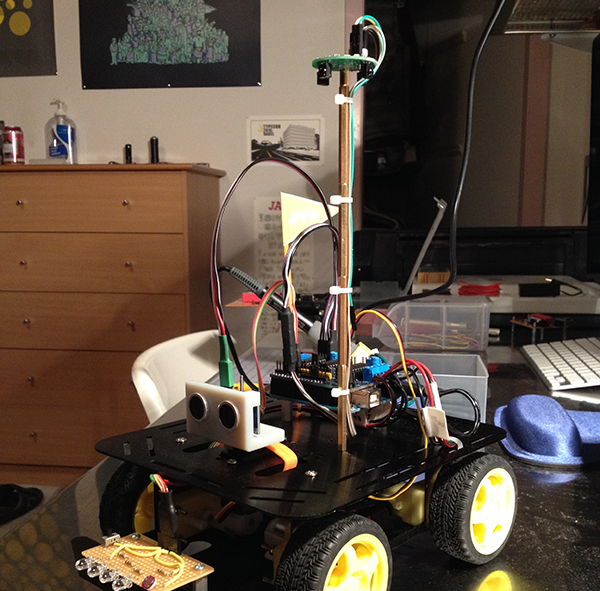
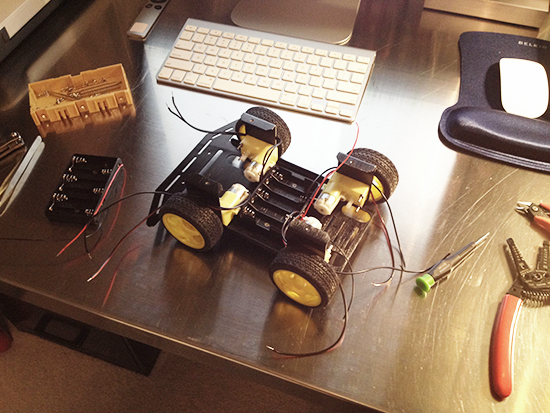
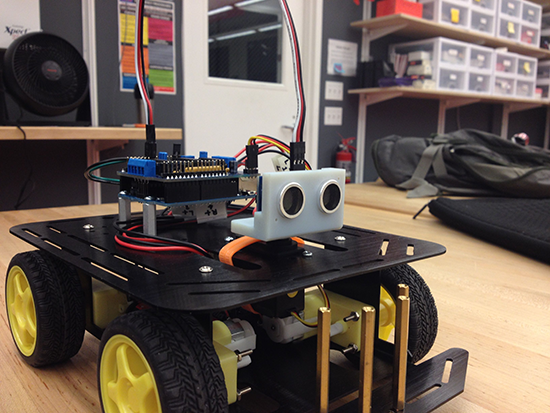
Once I had all my parts and components, and since I already had my schematic, putting it together went very smoothly. I ended up going with a DF Robot chassis, and then bought four dc geared motors which would fit inside the chassis. The chassis I bought already had some pre drilled holes for certain boards DF Robot makes, but I drilled my own holes for mounting of my hardware.
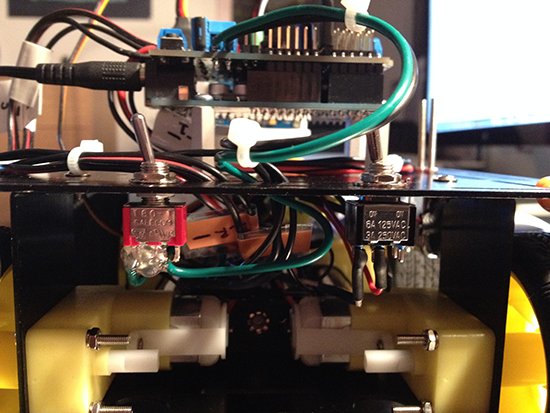
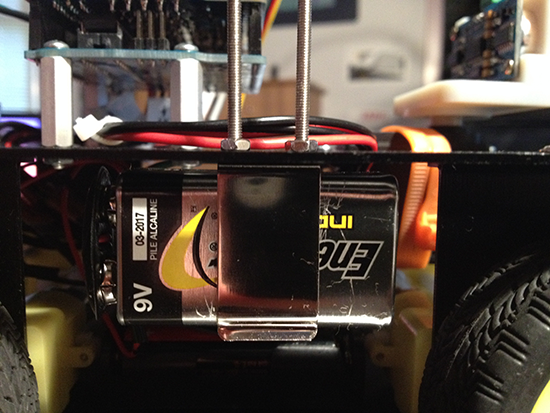
An important detail in my design was to have separate power for my logic and my motors. I used the AA battery pack to power my geared motors, and I mounted a 9V battery under the chassis for my logic (Arduino). As you can see in the image above, I have two separate switches mounted in the back of my bot. I want to also note how important organization is, not just for this project but any project. I labeled each wire coming out of my motors, and labeled any important wires I needed to keep track of. I also used zip ties to keep everything tidy and neat. This just helps me it look good, and also when you need to debug something, or upgrade something it easy to know where everything is.
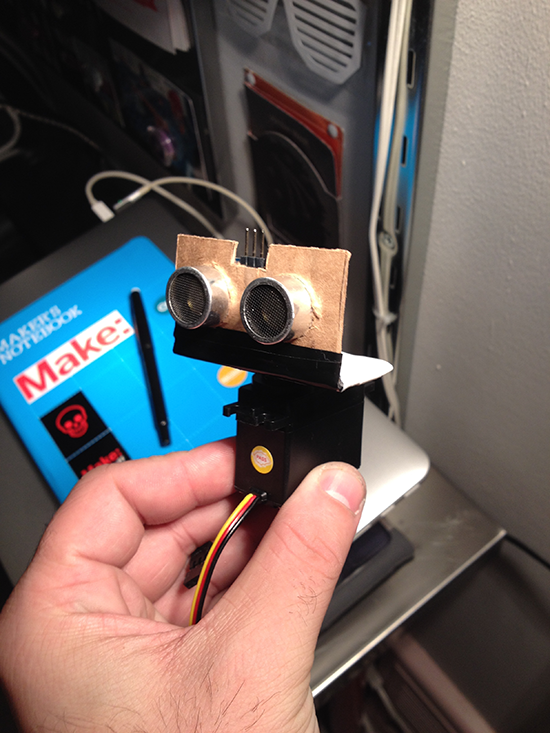
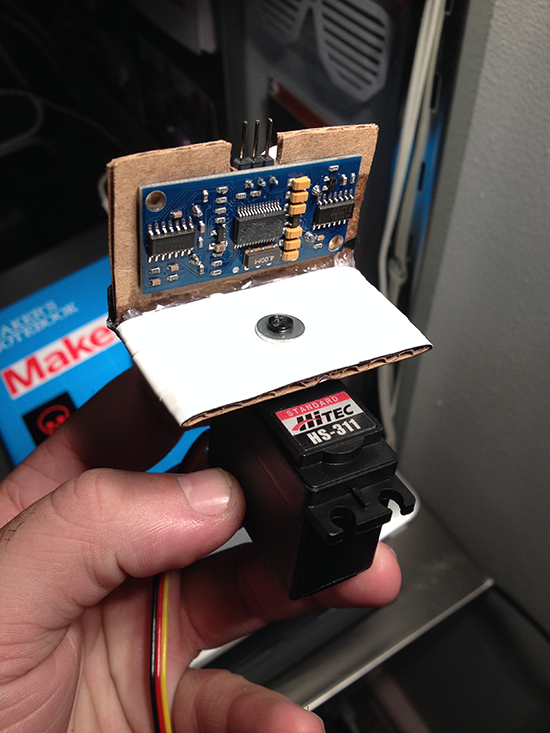
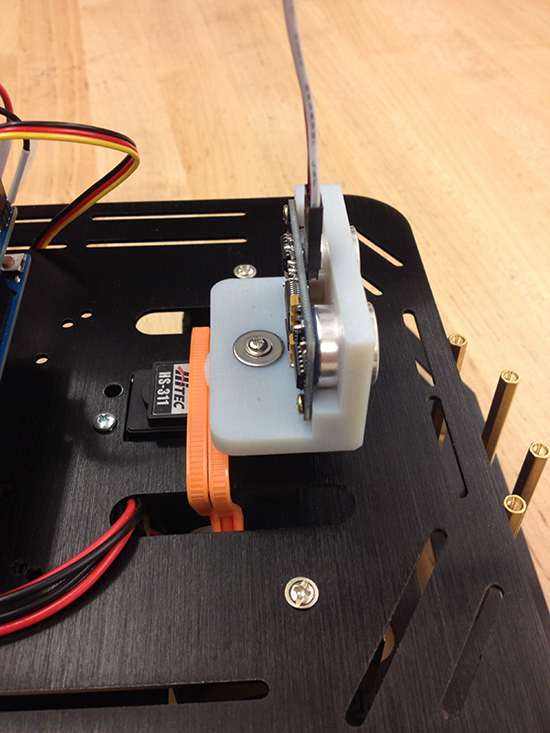
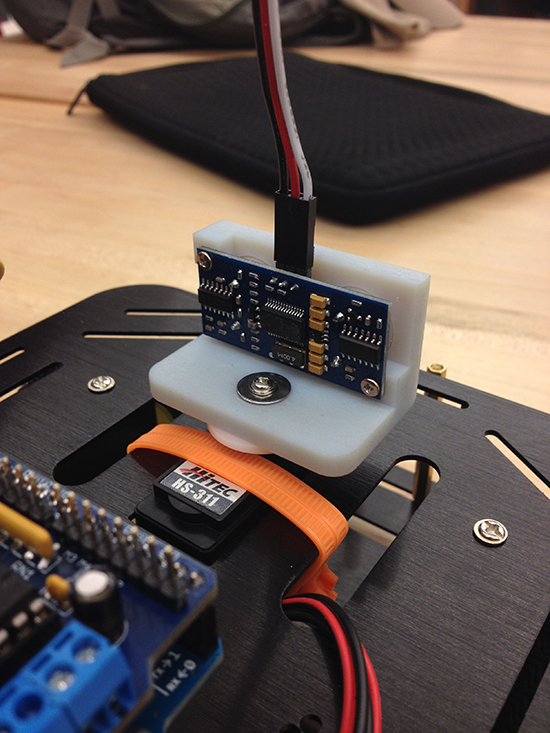
The whole navigation system for this bot relies on the PING sensor and the servo it’s mounted on. My first version for this, I simply hacked together a mount for the sensor with cardboard and hot glue which just screwed into the servo. This actually worked just find, and it led me to design a permanent and cool looking solution for the mount. I knew I wanted to 3D print one, and I found a few different designs on Thingiverse. None of the ones I found fit what I needed, so I forked a design i found and hacked it to work what I needed. I then printed it at me school on the Eden printer, I’m very thankful to have access to a $50,000 3D printer. Don’t get me wrong, I love desktop FLA printers, but sometimes you just need super high resolution.

Part 5 | Writing the Program
The code I came up with works pretty well as is, but there are still some bugs I need to work out. In corners sometimes the bot doesn’t know what to do, and will get stuck. Another problem is false reading, I need to figure out why it’s happening, but sometimes the bot will just stop and turn around fro no reason. My code is based off of a couple peoples code I found on Github, I basically spliced it into what I needed for my hardware, and the behaviors I wanted.
The Program
// HeeleyBot_Navigation.ino

#include <AFMotor.h> // Enables the Motor library
#include <Servo.h> // Enables the Servo library

Servo PingServo;
AF_DCMotor motor1(1); // Motor 1 is connected to the port 1 on the motor shield
AF_DCMotor motor2(2); // Motor 2 is connected to the port 2 on the motor shield
int minSafeDist = 11 ; // Minimum distance for ping sensor to know when to turn
int pingPin = A0; // Ping sensor is connected to port A0
int centerDist, leftDist, rightDist, backDist; // Define variables center, left, right and back distance
long duration, inches, cm; // Define variables for Ping sensor

void setup() {
PingServo.attach(10); // Servo is attached to pin 10 in the motor shield
PingServo.write(90); // Center the Ping sensor (puts it at 90 degrees)
motor1.setSpeed(240); // Sets the speed of the first motor (At 0, the motors are turned off. 255 is the fastest setting that you are able to use, I used 215 to not push the motors too hard.)
motor2.setSpeed(240); // Sets the speed of the second motor (At 0, the motors are turned off. 255 is the fastest setting that you are able to use, I used 215 to not push the motors too hard.)

Serial.begin(9600); // Enables Serial monitor for debugging purposes
Serial.println("Serial test!"); // Test the Serial communication

}

void AllStop() {
motor1.run(RELEASE); // Turns off motor 1
motor2.run(RELEASE); // Turns off motor 2
}


void AllForward() { // Makes the robot go forward
motor1.run(FORWARD); // Motor 1 goes forward
motor2.run(FORWARD); // Motor 2 goes forward
Serial.println("Going forward"); // Prints a line in the serial monitor
}


void turnRight() { // Makes the robot go right
motor2.run(BACKWARD); // Turns off motor 2
motor1.run(FORWARD); // Motor 1 goes forward
delay(1600); // Time required to turn right (1.6 seconds)
Serial.println("Motors going Right"); // Prints a line in the serial monitor
}


void GoBack(){ // Makes the robot go back
motor2.run(BACKWARD); // Motor 2 goes back
motor1.run(BACKWARD); // Motor 1 goes back
delay(1600); // Time Required to go back (1.6 seconds)
Serial.println("Backward"); // Prints a line in the serial monitor
}


void turnLeft() { // Makes the robot go Left
motor2.run(FORWARD); // Motor 2 goes forward
motor1.run(BACKWARD); // turns off motor 1
delay(1600); //Time Required to turn left (1.6)Seconds
Serial.println("Motors going Left");// Prints a line in the serial monitor
}


// Starts the loop to decide what to do

void loop()
{
LookAhead();
Serial.print(inches);
Serial.println(" inches"); // Prints a line in the serial monitor
if(inches >= minSafeDist) /* If the inches in front of an object is greater than or equal to the minimum safe distance (11 inches), react*/
{
AllForward(); // All wheels forward
delay(110); // Wait 0.11 seconds
}else // If not:

{
AllStop(); // Stop all motors
LookAround(); // Check your surroundings for best route
if(rightDist > leftDist) // If the right distance is greater than the left distance , turn right
{
turnRight();
}else if (leftDist > rightDist) // If the left distance is greater than the right distance , turn left
{
turnLeft();
}else if (leftDist&&rightDist<minSafeDist) // If the left and right distance is smaller than the min safe distance (11 inch) go back
{
GoBack();
}
}
}

unsigned long ping() {
pinMode(pingPin, OUTPUT); // Make the Pingpin to output
digitalWrite(pingPin, LOW); //Send a low pulse
delayMicroseconds(2); // wait for two microseconds
digitalWrite(pingPin, HIGH); // Send a high pulse
delayMicroseconds(5); // wait for 5 micro seconds
digitalWrite(pingPin, LOW); // send a low pulse
pinMode(pingPin,INPUT); // switch the Pingpin to input
duration = pulseIn(pingPin, HIGH); //listen for echo


/*Convert micro seconds to Inches
-------------------------------------*/

inches = microsecondsToInches(duration);
cm = microsecondsToCentimeters(duration);
}

long microsecondsToInches(long microseconds) // converts time to a distance
{
return microseconds / 74 / 2;
}
long microsecondsToCentimeters(long microseconds) // converts time to a distance
{
return microseconds / 29 / 2;
}

void LookAhead() {
PingServo.write(90);// angle to look forward
delay(175); // wait 0.175 seconds
ping();
}

void LookAround(){
PingServo.write(180); // 180° angle
delay(320); // wait 0.32 seconds
ping();
rightDist = inches; //get the right distance
PingServo.write(0); // look to the other side
delay(620); // wait 0.62 seconds
ping();
leftDist = inches; // get the left distance
PingServo.write(90); // 90° angle
delay(275); // wait 0.275 seconds


// Prints a line in the serial monitor

Serial.print("RightDist: ");
Serial.println(rightDist);
Serial.print("LeftDist: ");
Serial.println(leftDist);
Serial.print("CenterDist: ");
Serial.println(centerDist);
}
Final Thoughts
The last part of my bot I still haven’t finished. I’m still in the process of developing a beacon finding system, using IR beacons. The picture above is an example of the transceiver/receiver that is mounted on my robot. The basic concept is I would have a pair of transceiver/receiver exactly the same, one mounted on my bot and the other somewhere on the ground. Each module has IR receivers and emitters, and basically gives an analog reading for direction based of which receiver is being hit the most. It’s a simple concept, I just need to figure out how to pair that logic with my current navigation logic I already have. No matter what this has been a great learning experience for me, and I’m already thinking about what type of robot I can build next.